
This article will guide you through sending outbound text messages via Text Journeys.
Table of Contents
- What is a Text Journey?
- Step 1: Add credits to your account
- Step 2: Upload a group of contacts
- Step 3: Create your message
- Review messages
What is a Text Journey?
A Text Journey allows you to send outbound messages to your supporters en masse via text message. This means you can send supporters follow-up messages about your charity’s work, promote campaigns and events or ask supporters for further donations to help your cause.
You must have purchased ‘Message Credits’ to be able to send these messages and you must have your supporters' permission to contact them via text before you send them a message using this tool.
Step 1: Add credits to your account
Text Journeys operates on a credit system. One credit = one text message of up to 160 characters. So if you sent one text message to 100 supporters, that would use 100 credits.
Credits are available to purchase in bundles through the Donr Dashboard.
Click the green 'purchase credits' button in the top right corner of your screen and you will be presented with a pop-up form. Select the appropriate amount of credits and add your card details to purchase. Your credits will be added instantly.
We appreciate that for larger credit purchases, it may not be possible to pay on card. In these circumstances we can issue an invoice. Once the invoice is paid, we will manually add the credits to your organisation's account.
Wherever possible, we would recommend purchasing via card as credits will be added to your account instantly. If you have no other option but to request an invoice, we would suggest contacting us in advance of your campaign to organise this, as this process will take longer.
Step 2: Upload a group of contacts
In the Donr Dashboard, navigate to Text Journeys and then select 'Groups'.
This is where you can create new groups of supporters’ mobile numbers to send messages to. For instance, if you hold an event and collect communication consent from your supporters there, you may wish to send them event-specific follow-up, so you could create a group specifically for attendees of that event.
Select 'Upload new group' and you will be presented with this screen.
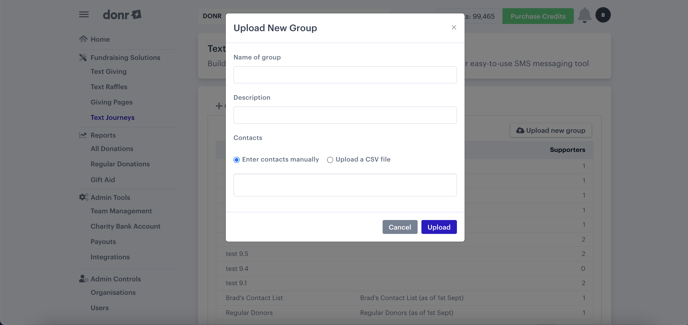
- You can add a name and description for your group, which will help you to identify each group.
- You can enter contacts manually by copying and pasting the numbers into the field, or you can upload a CSV file with a list of contacts.
- You should just include mobile phone numbers - please remove any other details including column headers as it may cause issues with your upload.
- The form has been built to accept numbers starting in '07', '447' or '7' so any of these formats are fine.
- The form will remove any spaces from the phone number, so it is fine to upload a number with spaces or without spaces.
- Before uploading, be sure to check your mobile phone numbers to ensure that there are no other characters (like letters or symbols) and that numbers are the correct length (a mobile number should be 11 characters when starting with '07'). Problems of this nature may cause your group upload to fail.
- Once you have added all numbers, click the 'Upload' button. Your group will appear in the list. You can check the number of contacts uploaded to see how many numbers have been added to the group.
- If your group is particularly large then it will continue to upload in the background - you can do other things on the Dashboard whilst it uploads.
Step 3: Create your message
In the Donr Dashboard, navigate to Text Journeys and then select 'Create'.
You will be presented with this screen.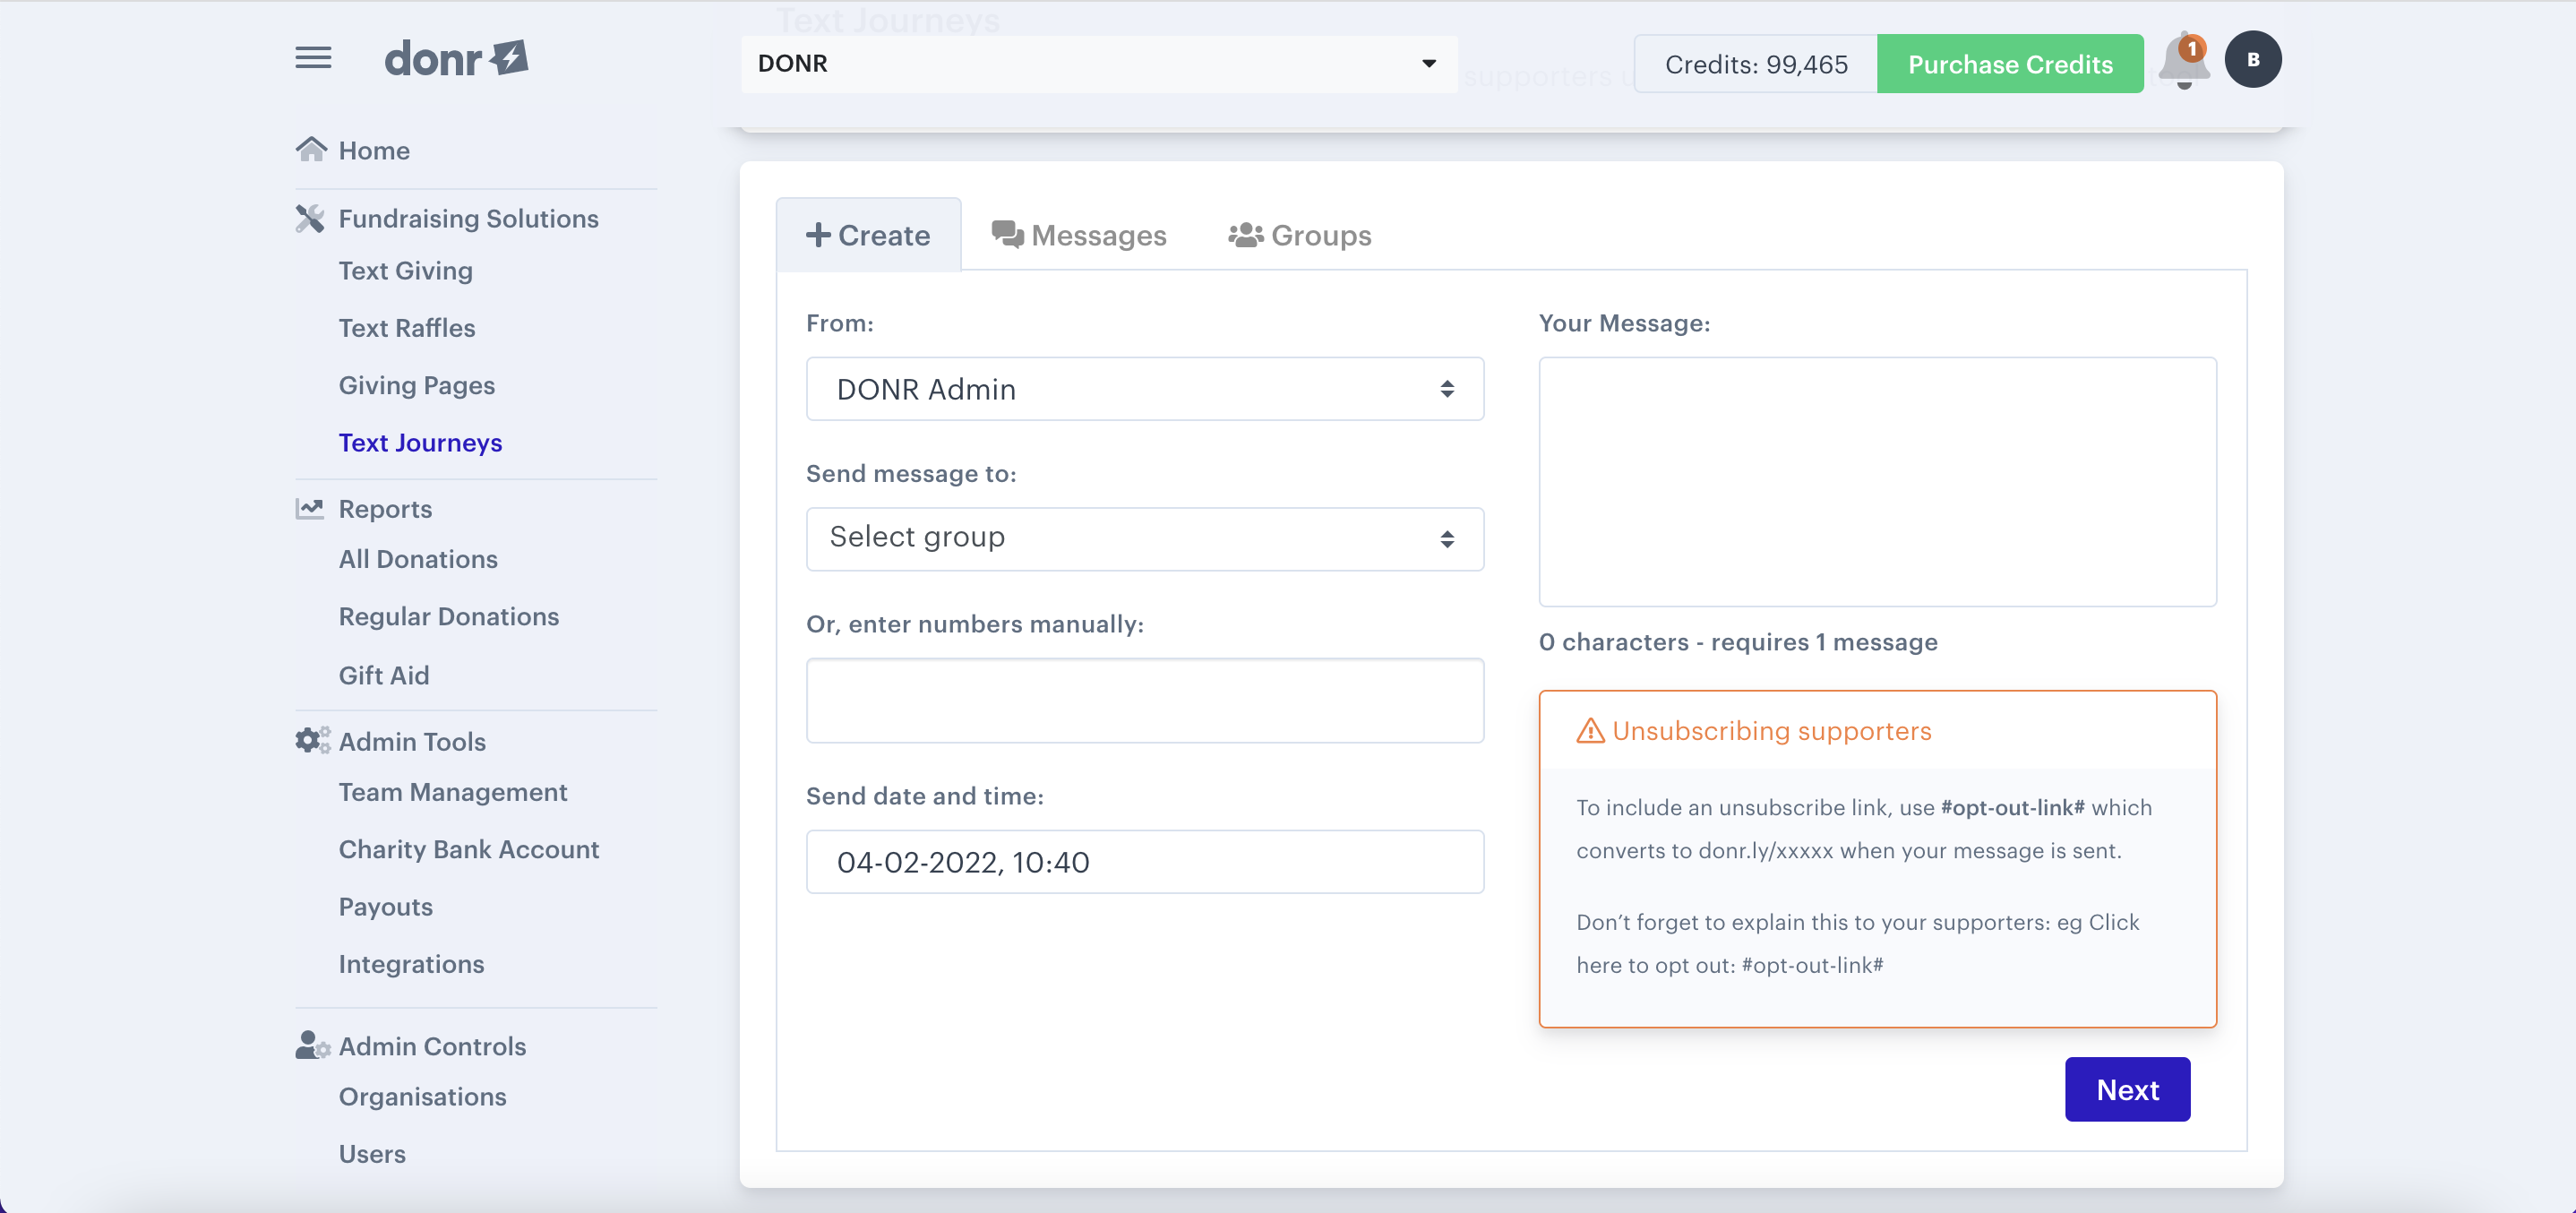
- The ‘From’ field is the name of your charity, as it will be seen by supporters when they receive your text message. Please note, this field is limited to 11 characters so your organisation’s name may be abbreviated.
- If you would like your 'From' name to be changed, then we can do this for you. Please contact us with your chosen name, which can be 11 alphanumeric characters.
- In the 'Send message to' field select the group(s) you would like to send your message to.
- You can also copy and paste numbers into the 'enter numbers manually' field. You may wish to add your own number here, so that you know when the message has successfully been sent.
- Choose the date and time your message is sent on the ‘send date and time’ field.
- Type your message into the ‘Your Message’ field. Under the field you can see how many characters you have used and how many messages that counts as.
- A text message is 160 characters and each message costs one credit. If your message is longer than 160 characters, it will be received by supporters as one message but you will be charged more credits.
- To include an unsubscribe link, copy the #opt-out-link# from the ‘Unsubscribing supporters’ information box. This will appear as a link which will allow supporters to access a web page where they can remove their consent for future communications.
- Once you have set the fields as you wish, click ‘Next’ to confirm the details of your new Text Journey then hit ‘Send Message’ to send/schedule or ‘Close’ to make changes.
Review messages
Should you wish to review your message before or after it is sent, you can do this by navigating to 'Text Journeys' and then 'Messages'.
- The ‘Message’ column shows the start of the copy of your message. To view the full content of your message, use the ‘three dots’ button to the right of the message and select ‘View.’
- The ‘Scheduled’ column shows the date and time that the message was sent, is scheduled to be sent or was scheduled to be sent before it was cancelled.
- The ‘Status’ column indicates whether a message has been sent, is scheduled or was cancelled.
- To cancel a scheduled message, select the three dots next to the relevant message followed by 'Review' and 'Cancel'.